DriveScan Plus > Dialog
Scan drive
The Dialog Scan drive allows you to scan you to scan media of all kind quickly and comfortably. The scan process is split into several steps.
Step one: Choose drive

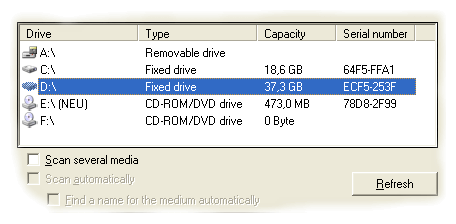
At first you get a list of all available drives combined with some information on disk label, capacity and serial number. This list can be updated by a click on the Refresh-button, for example after you have inserted a new medium into one of your drives.
Scan several media
If this option is activated, the program will return to the page Choose drive after every scan process, i.e. the window is not closed automatically.
Scan automatically
This option is only available if Scan several media is activated. If a new medium is inserted into the currently selected drive, this medium will be scanned automatically.
Find a name for the medium automatically
If this option is activated, too, the scan process is completely automatized, i.e. you only have to insert CDs, DVDs or other removable disks into the currently selected drive one after the other and DriveScan Plus will scan them automatically.
Names are created by the following rules:
- If the medium has a name and this name is not already used for another medium in the current category, the medium will get this name.
- If the medium does not have a name or if this name is already used, it is labeled "Medium ", followed by a number which is incremented by the value "1" whenever you scan a medium.
Step two: Choose category

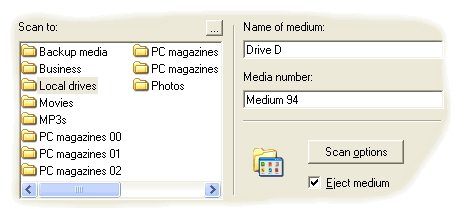
Here, you get a list of all available categories. You can add further categorie by clicking on the button "...".
Choose the category you want the medium to be stored to.
Name of medium
This textbox contains the label of the selected medium and can be adjusted to your needs. This name will be used in the program to refer to the corresponding medium.
Media number
The media number is a data field you can use to localize your media in a special system such as your shelf. Enter for example "CD box 3, Row 17". This information is permanently shown in DriveScan Plus whenever you are prompted to insert a specific medium and helps you to find the corresponding media quickly.
Scan options
This button opens the dialog Scan options where you can influence the program's behaviour during a scan process.
Eject medium
This function is presently available under Windows NT 4.0, Windows 2000 und Windows XP only and opens the selected drive after the scan process (if the drive supports this feature).
Step three: Enter annotations

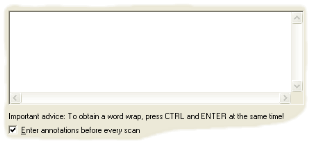
This page is only shown if the corresponding option is activated in the dialog Scan options and allows you to enter a description of the current medium. This text can contain keywords for instance which describe the current medium or it can contain overviews over tracks of Audio CDs. Thus, media can be found more quickly and comfortably with the help of the integrated search function.
See also
 Scan again
 Scan options
 Scan options


 Scan again